Conversions are essential for your Shopping campaigns. Without conversion data, you won’t be able to assess performance and enhance campaigns. Make sure to build up your websites’ conversion tracking setup before creating your campaign.
What is Google Ads Conversion Tracking?
Google Ads conversion tracking helps you monitor how efficiently the ad clicks result in valued customer activity on your website like purchases sign-ups and form submissions. With this, you’ll be able to see which of your Google Ads advertisements create the most sales in your e-commerce store.
Photo Credits: Invisible PPC
Google Ads Conversion Tracking Set Up Requirements
Before you set up your conversion tracking, you need to:
Have a Google Ads account
Be running or planning to run an ad through Google Ads
To start the set up of your Google Ads conversion tracking, you must create a conversion action, install the global site tag, then add the event snippet. And if you’re planning to track the purchases, you will be needing to edit the event snippet and adjust the worth of the conversion based on the purchase total.
Step 1: Create a conversion action in Google Ads
For you to set up the Google Ads conversion tracking, you must check out the Google Ads instructions to create the conversion action.
If you plan to track purchases to see how effective your ads are at creating sales in your e-commerce store, choose the category Purchase/Sale, and the value to Use different values for each conversion.
Once you’re done creating your conversion action, you can now select create and continue.
Step 2: Install the global site tag
You can install the global site tag in your Shopify theme code. Here’s how:
Click on the Set up the tag step in Google Ads, select Install the tag yourself.
In the Global site tag section, choose the option that applies. The generated code depends on your selection.
You must copy your global site tag as you will need this for the next step.
Open your Shopify admin and click Online Store in another browser window.
Click Actions then Edit code.
Open your theme.liquid file.
If this is the first time you’ve installed a global site tag, paste the copied global site tag between the <head> and </head> tags to apply the tag to every page in your store. If you’re editing a global site tag that you’ve already installed, locate the global site tag in your theme.liquid file then change the code as suggested by Google Ads.
Tick Save.
Step 3: Mount the event snippet
You should add the event snippet to your checkout page after you installed the global site tag. The event snippet tracks a conversion every time a visitor clicks your ads and then eventually reaches the checkout page on your online store.
Inside Google Ads, under the Event snippet section, select Page load.
Copy the event snippet code.
Open your Shopify admin in another browser window and click Settings > Checkout.
In the Order processing section, select the Additional scripts text box, paste the event snippet. If you already have code in the Additional scripts text box, add the event snippet on a new line below the existing code.
Copy the global site tag used in the Install the global site tag. Add this tag above the event snippet added in step 4.
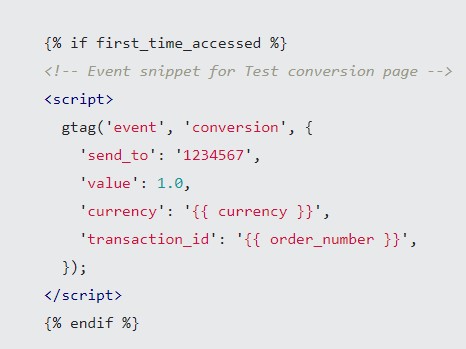
If a customer reloads the checkout page, Google Ads might record a duplicate conversion. To stop the duplicate conversions, you must add tags before and after the event snippet so that it triggers once per customer:
On the line before the snippet, paste {% if first_time_accessed %}.
On the line after the snippet, paste {% endif %}.
The default currency is in USD. If you don’t sell in US dollars, replace 'USD' in the event snippet with '{{ currency }}'.
The default transaction ID is always blank. To keep Google Ads from recording duplicate conversions, next to ‘transaction_id’: replace '' with '{{ order_number }}':
Click Save.
Photo credits: Google Support
Step 4: Make the conversion value effective
If the conversion action you’re looking out for is tracking the purchases on your online store, you must anticipate that the value of each conversion will be different.
For example, Irene is the owner of a jewelry store and is running two different ads on Google Ads – one for her collection of watches, and one for her collection of shoes. Both ads create a parallel number of clicks and sales in her store; however, the value of the purchases made by the people who click on the watch collection advertisement will be higher than the shoe collection. The value is higher because the buyers purchase more luxurious items after clicking that ad. This is where Irene uses the information to choose where to spend her advertising budget.
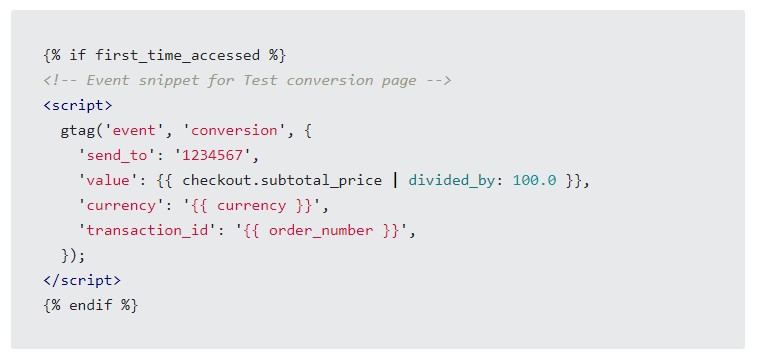
Open your Shopify admin and click Settings then Checkout
In the Order processing section, inside Additional scripts text box, check for the event snippet
Replace the line beginning with 'value': with the following snippets:
Photo credits: Shopify
You can check the tracking status on the Conversion actions page in your Google Ads Account to make sure your tag is working. Note that it may take some time for the conversion tracking tag to show as verified.
Need help in setting up Google Ads conversion tracking and event snippet for your e-commerce store? We can assist you with this so you can start advertising your shop soon. Contact us to speak with our experts.
About D38 Ecommerce Agency
D38 is a South East Asia-focused e-commerce agency that provides end-to-end c-commerce solutions to grow your business in the digital space and generate ongoing monthly revenue. Our e-commerce solutions range from website development, store management, logistics, CRM, customer loyalty programs, automated email marketing, SEO, marketing tools, product press-release (PR) to reputation management – helping international companies simplify e-commerce management across ASEAN Economic Community (AEC).
Our team consists of certified Shopify eCommerce experts, designers, developers, content creators, and strategists working together to support and provide a seamless online shopping experience for our clients’ eCommerce websites.
We also have a market-specific digital channels team focusing on providing support for LINE Thailand and Japan, Naver for Korea, and ZhaoVN for global Chinese readers for social news and updates.